A Pile of FabricMarch 7, 2024
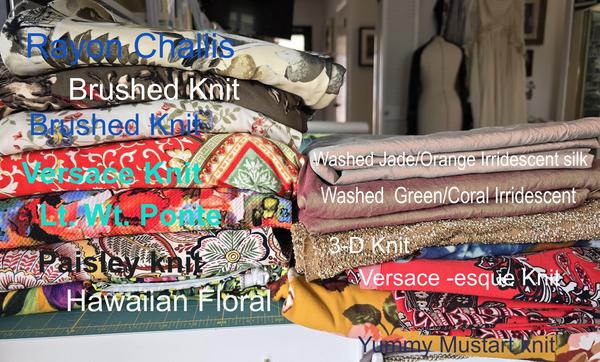
So I often have a few small piles of
fabric laying around just waiting for inspiration. Something I want to make up but not quite sure how.
This is as much for inspiration but certainly not a guilt trip. One group is specifically from today as I found out my local fabric shop had a fabulous stash of silks that just came in - some were deliciously irridescent and the first thing I like to do is
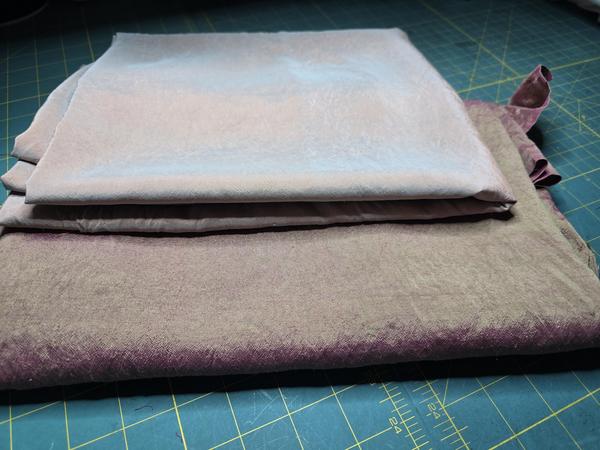
wash them. This makes them softer and a more casual fabric, in a very subtle elegant way. The iridescent fabrics are particularly interesting after you wash them cause they take on the dominant color - usually the weft weave, but the nap or shadow will be the warp weave, which makes the shadows all that much more interesting. The fabric also changes from a very stiff and formal fabric, to something much more interesting and casual.
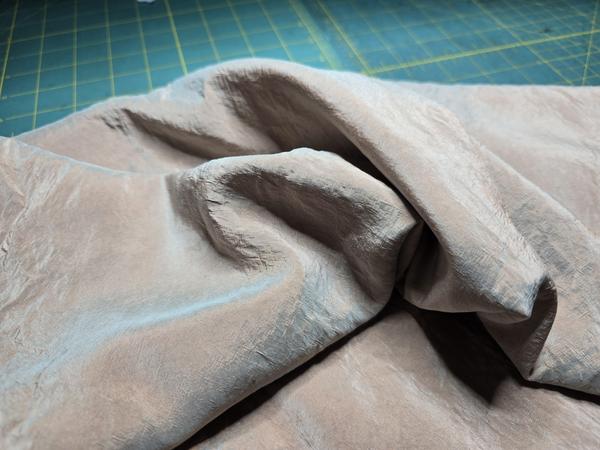
These look relatively mild-mannered and one on top looks khaki-ish while the one on bottom looks more tan-ish. But you wiggle them around....
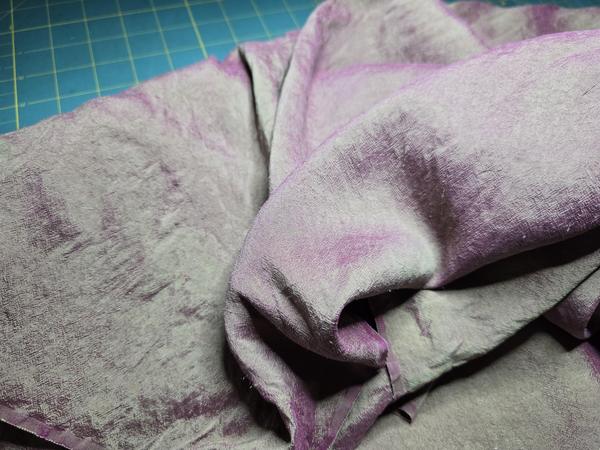
Wow - they really sing. The top is orange/jade, while the bottom is purple and green! These irridescent silks can really be something special. I bought one other white/orange, which comes out very coral, and looks stupendous on Walt.
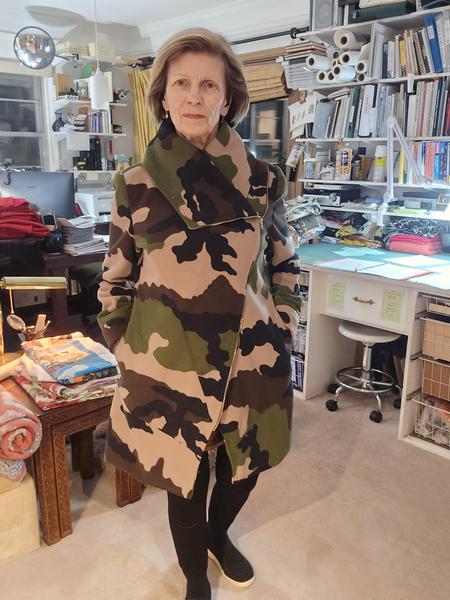
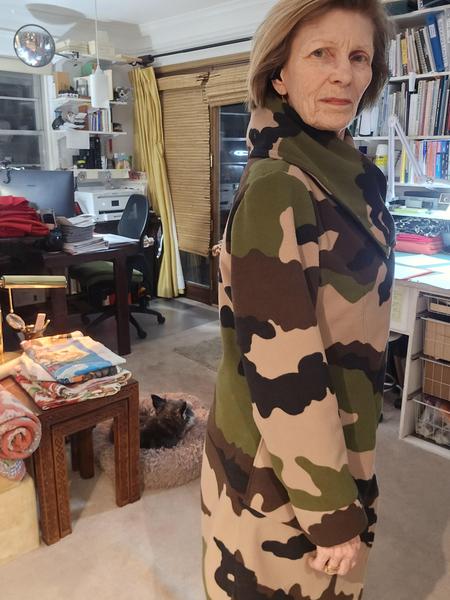
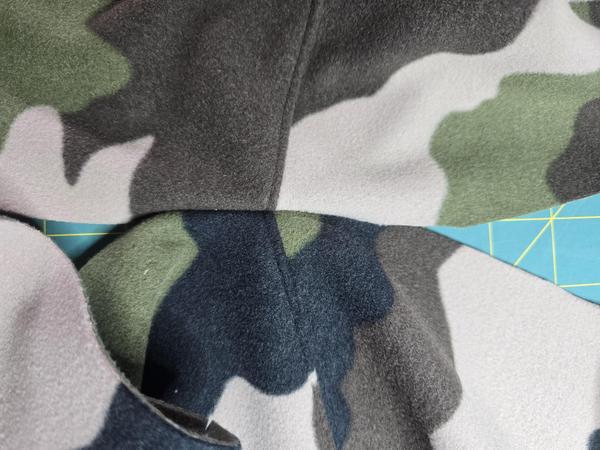
So I've had a stack of camo that I got from Ann Steeves over at Gorgeous Fabrics.
And I have never met a green I didn't like and just loved this. It also had the other side with an olive which made it even more fun.
And then this has been beating me up constantly "DO ME!" So after congitating, and the other fabric was a beautifully intricate Indian Blanket type pattern which I knew would be impossible to match with this new StyleARC pattern, I just figured the camo was
better. Initially I thought about doing the camo of course on the outside, and the reverse in the solid olive. But I forget that these "cut right side once, cut the three left side pieces once" can be a real headache, particularly when I don't cut from the original pattern - I always trace these off. It got so confusing that I thought I had cut it out wrong, and decided to take the night off and come back the next day and found that I had cut it correctly (WHEW!)
So first let's talk about need - I needed something a little newer for Walt's and my trip out in the RV. And it used to have to be hiking functional, but now it's more about the "look,"
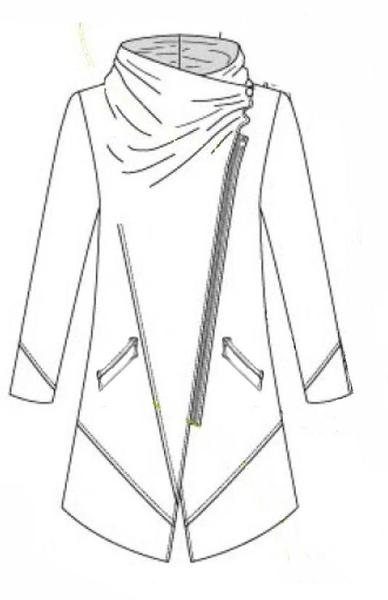
I have the functional stuff, I wanted something smashing that would look woodsy suitable. Enter the Geneveive coat. So I had seen on the StyleARC website that she was redesigning it and couldn't wait for the new one to come out. Well, not
only is it fabulous as ever, but it has all the sizes in one pattern. So when you click that photo of the pattern above, it's on Etsy, and you can get the whole pattern - all sizes, for a download price.
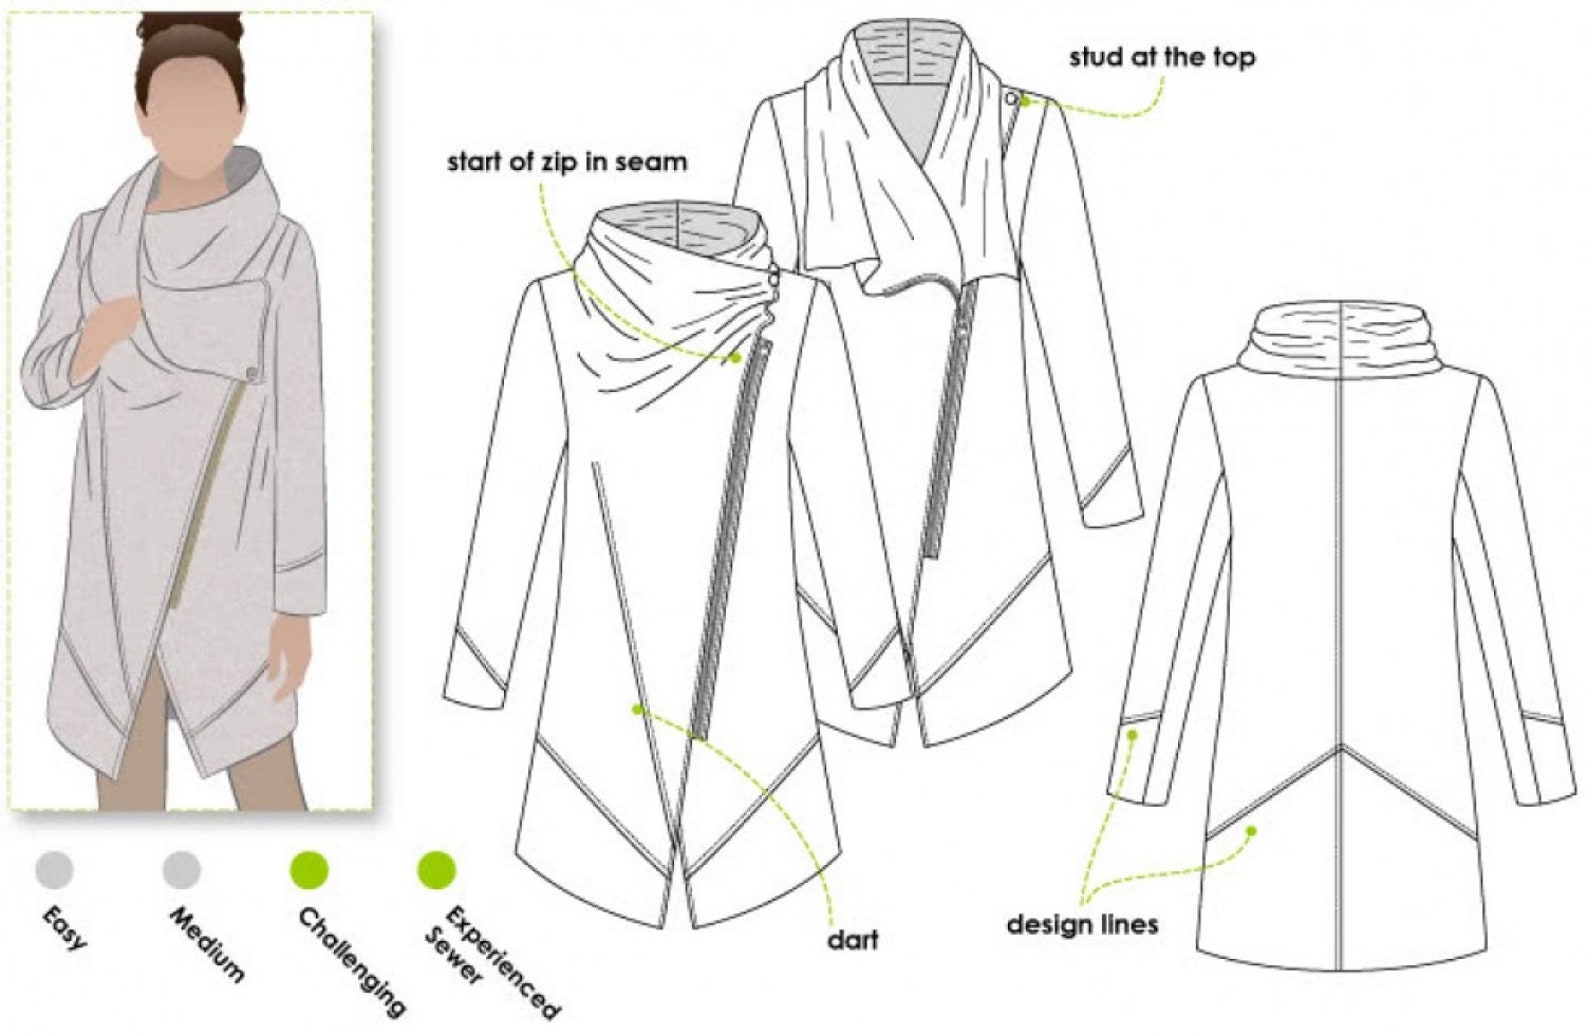
So let's talk a little about this pattern.
- It has a fabulous shoulder line. That means that it will sit and hang well, not off the shoulders, which you see in a lot of hiking gear. And the sleeve goes in to create a nice crisp sleeve head - something I really love!
- It has some dramatic and great seam lines that add to the line of the garment
So, let me insert something about StyleARC that I have always liked. She designs with the most sophisticated and excellent lines and art of the pattern that is hardly surpassed these days. I remember the line of some of the designer Vogue Patterns of
the 50s and 60s. It was "all about the line, darling," back then, and designers took extra care to ensure the line was correct. I don't know if the creator of StyleARC went to design school, but it wouldn't surprise me. Case in point. Look at the slight nip at the waist in this pattern. It's very subtle, and unless you're looking for it, you won't see it till you put it on. Additionally, when you look at the pattern pieces, you can see it there as well
Looking at the pattern, great care is given to make this jacket architecturally interesting and shapely, and it has some lines and styles. I have always appreciated StyleARC patterns for this and have hardly ever been disappointed in their patterns.
Even some that I think will never work (like the Sailor Sue, which is offline to redesign it - can't wait for that one!) works beautifully cause the dang pattern design has good lines. So, recommending a StyleARC pattern becomes very easy to do because they have so much in style and line to them.
OK, Back to my list of things about the Genevieve Coat.
- This pattern also looks like it would work well in a variety of weights. The one I did is really heavy, yummy fabric. I'm cold-natured, so I like heavy stuff like this that I can zip around my neck. But a lighter-weight ponte or even light-weight wool would work for this. I wouldn't go past about 30% stretch, and even that might be a stretch (ha, ha!!!) A ponte in a gay floral print would
look very Palm-Beachy, spring-ish, and summery for those cold air-conditioned nights.
- The angle of the bottom trim and sleeve trim looks funky, but again, with the line stuff, it works. These are solid, great design themes, and in a fabric that's a little thick (like a fleece), the top stitching in a contrasting color would be fabulous.
- OK - my only complaint - and this is minor. That seam in the middle of the right side is a dart, and I would make the zipper a dart,
too. This is so minor it's not even worth mentioning, but I've done a lot of customizing to this pattern, and then next one I will do this way - and I will be making this pattern again.
- I chose the size with the shoulder, and it worked great on me, but it was the smallest size. Shoulders are hard to alter, and my shoulders have become smaller in the last couple of years. (Thanks to my body entering its seventh decade on this planet, I'm getting shorter and
smaller!!!!)
So finally some shots with some really good show of the customization I did.
So, even with my hands in the pockets, it looks great - the pocket placement on the side seams is excellent. The coat has some shape, which is always one of my key points in making clothes. I'm from the old school, that clothes are supposed to flatter
and make you look attractive. This silhouette works for me and you can see the "line" that I think so much of in the finished garment.
The one problem here is that the pockets are in the side seam, and I've gotten so used to having them about halfway between the side seam and center front. The next time I make this coat, I'll do a welt pocket
And then we get into some major design issues and whether or not these pockets conflict with the designs lines of the coat, or if they are a complementary (as in opposites) interesting function. I'm going to have to sketch this out several different ways to
solve this design problem, but this does solve the placement of the pockets where I want them - it's if it's the right design solution that's the problem.
OK back to the finished pictures...and one thing I did do was make these pockets big. All my pockets are big cause my phone is a large Galaxy Ultra Note Plus - it has the pen so I can take it down and write down notes and draw stuff on my phone. Then I have an el-destructo case so it's also waterproof, not that I'm
going swimming, but it really protects it against cracking, screen breaking and all that stuff that happens to phones, because I keep my phone on a lanyard, so it's always swinging around. But big pockets make my day!
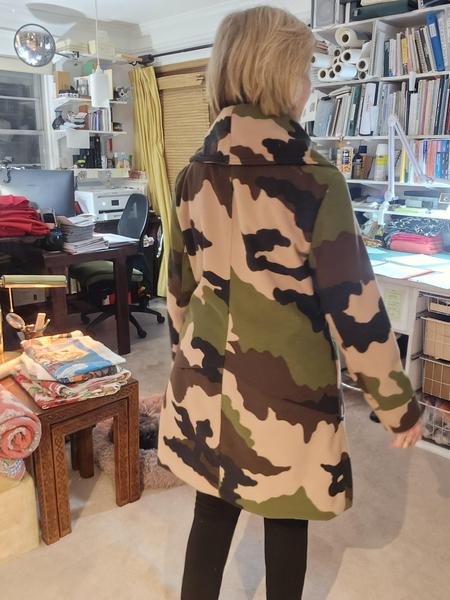
The side silhouette in back is nice - not too much nip in - it could be a little higher, but it's nice. But look at how straight it is in front. That's the problem with the zipper. The zipper needs to have just a very slight dart built in like
it does on the right side. This wouldn't be that hard to do cause that dart on the right side is just slight. But the straight zipper needs just a little shape to it.
Here's the shape on the back seam, and it's really very slight and goes completely in line with the rest of the silhouette of the coat. It's awesome.
In working with this fabric, I've found it very soft but very tacky-ish—IOW, it grabs any fabric. Several times when I was doing fittings and trying it on, if my top was the least bit brushed or sticky, the sleeves would be a total pain to get on. Easy fix: line
the sleeves and pull out some wonderful Bemberg in a complementary green (I have a LOT of greens in Bemberg), and voilà —it's done, and my arm slips right into that sleeve.
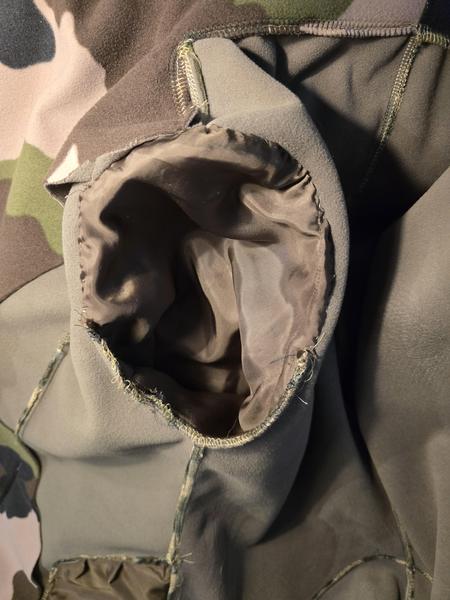
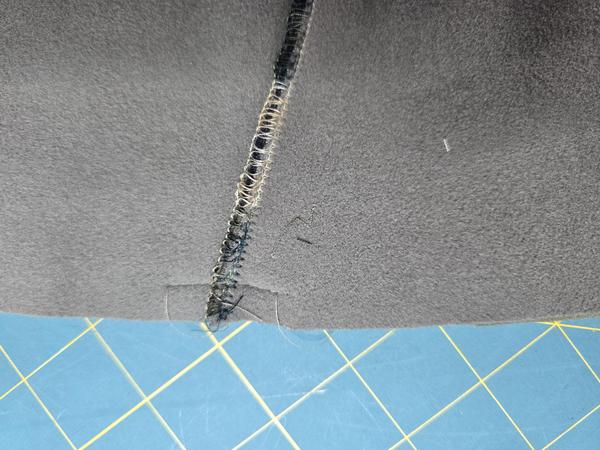
Finally, the pockets flapped all around inside the coat. I thought about cutting two pockets and sewing the back side to the front, but that would make a very flimsy pocket for a reasonably substantial jacket. But I don't like pockets flapping about
wandering around trying to find them when I'm looking for keys or my phone, so anchoring the pocket at least the upper half so the lower half can fall free and in place. Here, you can see exactly what I did on the top half. The way the pockets turned out is just excellent. They have a smaller opening (so things tend to stay in them), and yet it's deep and roomy so that I can fit my big, fat phone in there, and yet it's secure.
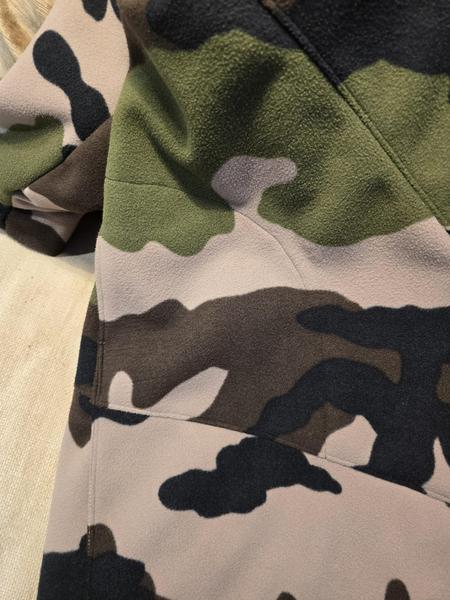
One last photo here. There was
a ton of matching those seams - the slanted front and back seam to match the side and sleeve seam. I had cut another undersleeve "cuff" piece because I didn't have anything long enough for the whole undersleeve—No matter if it makes it look like it's part of the design.
This is just yummy when those seams meet.
But this isn't by accident. I sew just over the seam only where I need the match. Then, turn it to see if it's matching, and then start at the beginning of that seam and sew to the end, sewing right over this matched point already, and I end up with
the picture just above this one. It perfectly matched and looked fabulous.
This was a fun garment to make. It is a pain to cut out and can be confusing as hell. But following the right side and wrong side of the pattern when you trace it out, and getting a little finnicky about it will prevent you from making disastrous
mistakes, and of course it helps when you have a one-sided fabric to add to the confusion.
I'll make this coat again, only in a lighter weight. A lightweight woolen would be dreamy for this, or a light-weight ponte. I'll keep my eyes open for something like that - the floral idea is really beginning to call to me.
The coat is now headed to the RV, where it will find a life in the wilds of nature when Walt and I visit fun nature spots. We're headed to Eastern OK, for the eagles before the chicks are all gone.
The SewingArtistry Resource Library is designed to contain information to not only make your sewing better, but to aid in you fitting and flattering your shape, size and style. Check it out.
Look for future classes coming in 2024
The Core Pattern Shirt, (one of my favorites for woven core pattern that you can make into a myriad of different
garments),
Basic Knit Top (core pattern class for knit basic tops, shells, tees, dresses, and tunics)
|
Tracking a fashion trend isn't all that hard after seeing a few of them.
Living from Mid-Century Modern through Twiggy...
It's worth the time to look at these styles, particularly today as
there is a group of that wants to look....
This is the way fashion used to be -- pretty, flattering and I can't wait to make some of...
NOTE: There are some folks who can't get my email, or it's sporadic, or something is hinky. I will always respond to any of you who send a private message, whether it's about the topic of the week or something else. If you don't get anything
from me, it's probably because the [email protected] email is blocked, and even a private message can't get through. In that case, I'm on Instagram often, and you can always PM me at @sewingartistry.
As a precaution,
please ensure I'm in your email Address Book and check your spam, junk, and trash folders. Some email clients get extra excited when they see emails coming into the Inbox that go to many other receivers. They automatically think it's trash or spam, and it never makes it to the Inbox. I must constantly check my spam and junk folders to ensure I'm getting the emails I subscribe to.
To view in browser along with past emails, click here. We respect your email privacy. |
|
|